Automatic backup Maria DB
The recommended backup route will always be MySql Workbench (Linked Here) as it offers more control with the dB.
Recently, however, the CMD backup applet has been updated to work with the current version of BioStar 2.
Features of this backup tool include:
Ability to back up all setting files, license & enckey, not just the dB.
Ability to set up automatic backup by running as a scheduled task within task scheduler.
Small size due to using existing MariaDB files.
Separated restore tool that uses backup files from the backup step.
The tool can be downloaded (from here).
Now Tested with versions 2.7.10 - 2.8.9
The tool is made up of two batch files and a Templates folder

There is also a How to txt file that provides steps, but I will go through them below.
Section 1: Backup
Once unzipped, the folder structure will be like the one above. Running 'Backup Generator.bat' will load the backup tool.
As this is just the generator for the backup file, this can be run as a standard user or just by double-clicking.

Once loaded, the first step will be selecting system architecture, most recent computers will be 64bit (Option 3) but the tool also supports a 32 bit install on either a 64 bit computer (Option 2) or a 32 bit computer (Option 1). Enter option and press enter.

The next option will be Drive Letter, this will be the drive letter of where the BioStar 2 install is located. By default this will be drive C for the local disk, but if external storage has been used, you can select drive D,E,F etc... Enter option and press enter.

After this, the tool will ask for Database ID, if using a standard MariaDB installation, this will always be 'root', the only way for this to be different is hosting a separate manual installation of MariaDB. Enter this option and press Enter.

The next step will be to enter a password, this will be the dB password entered during setup, Enter Password, and press enter.

Next, it will be selecting the installation location of the enckey file, select Y if in default directory. If N is selected, you will need to type the location. This setting is only applicable from 2.8.0 onwards, if backing up an install before this, just select Y.

If N is selected, you will need to type the location of the actual file. (EG C:\Program Files\BioStar 2(x64)\util\enckey).

Finally, enter the folder location of where you would like the backup files to be located, I usually use something simple like 'C:\Backup'.
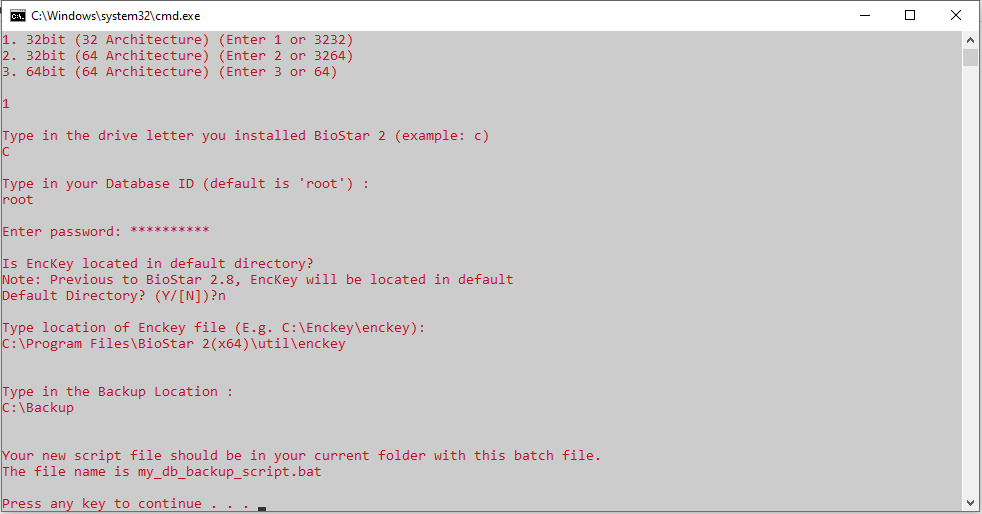
Once a backup location is entered, the script will generate the actual backup script (in the same folder that the .bat files are located) Press any key to exit and find the script called 'my_db_backup_script.bat'.

This batch script contains the specific setup for your install of BioStar 2, double-clicking on it will run the backup, if admin credentials are not detected, it will prompt for them. If any errors occur when running the backup file, provide a screenshot of the CMD window and we can diagnose what went wrong. You can also set this file up to run at specific times, using windows task scheduler.
When job completes successfully, the backup folder should look like the below:

That's the backup taken!
Let’s now create the schedule for automatic backup. Please copy the script file created with your settings and place directly on C drive

Open Task scheduler


Browse for your script on C: drive


The script requires Admin privileges in order to execute by itself. Let’s provide those Admin rights.
Find the Biostar 2 trigger and double click to open

Select “Run with highest privileges” and OK


You are all set
To Restore files from automatic backup
Section 2: Restore
There is one file left to explain, the Restore.bat file.
Located in the same folder as the Backup generator, if you double click this file, it will prompt for admin credentials and then run through the restore process.

The first step will be to locate the folder that was used in the backup step above, Mine will be 'C:\Backup'.

Select Y on this screen, Just make note that if restoring to an installation with pre-existing data, that this data will be wiped (if you haven't backed it up previously)

Enter system architecture, this will be the same as above in the backup step (Most likely x64)

Type in drive letter (Same as backup tool above) (Most likely C)

Enter Database ID the same as the backup step, 'root' by default. After this, enter password.

Once enter is pressed after entering password, the database restore will begin, It will first drop the existing dB and then restore the backup. One for the AC database, one for the T&A database and one for the Video Database too.
After it has completed the database restore, it will then restore the misc files (.conf, enckey, security)
If the enckey is being changed, you may have to manually stop and start the BioStar 2 services for the new enckey to pull through.
If you wish to change enckey location on a new install if you edit the file path in enckeyloc.txt present within the backup files, the tool will then restore the file to the new location, however, you will also need to change the file path within system.conf.
If you then browse to the BioStar 2 webpage, you will be able to login using the password from the previous installation.