
Affected Version: BioStar 2.9.4 or above
Affected Products & Versions:
Please refer to the article linked at the bottom of this article.
Are you using BioStar 2 and Suprema devices integrated with a third-party system and looking for a way to read smart cards issued by that system?
BioStar 2 version 2.9.4 now supports a Custom Smart Card Layout feature, allowing 3rd-party-issued smart cards to be read.
Please be aware that the [Custom Smart Card Layout] feature only supports reading custom smart cards; issuing (printing) custom smart cards is currently not one of its features.

Starting with BioStar 2 v2.9.10, Custom Smart Card settings can be configured for a supported Slave device even if the connected controller does not support the feature. For CoreStaiton used as an RS-485 Master, firmware v1.7.2 or later is required to support Custom Smart Card on connected Slave devices.
In BioStar 2 Version 2.9.4, Smart Cards are categorized into two main types. 1. Suprema Smart Cards and 2. Custom Smart Cards.
- Suprema Smart Cards
- Suprema Smart Cards are issued using a Suprema device or BioStar 2 and can contain a user's biometric information.
- Custom Smart Cards
- Custom Smart Cards, on the other hand, are cards issued by third-party products or systems without biometric data.
- It's important to note that while BioStar 2 supports custom smart card reading, it does not support the issuance of custom smart cards, as noted above.
The Custom Smart Card Layout feature supports MIFARE and DESFire, with FeliCa support added in BioStar 2 v2.9.6. Supported card formats depend on the device model and firmware version.

For FeliCa configuration instructions, refer to How to Read the Encoded FeliCa Standard Card Through Custom Smart Card Layout.
Notable features of Custom Smart Card Layout
- Supports RAW type of card data
- Supports smart card byte order
- Supports byte skipping when reading card data
The smart card byte order has been supported since BioStar 2 version 2.8.16; this feature ensures smart card data is read and processed correctly, regardless of the byte order used in the card's data structure. This helps prevent data interpretation issues caused by byte-order mismatches.
The byte-skipping feature allows specific bytes to be skipped when reading card data. This is useful when the required data is stored within a larger data block. By configuring the number of bytes to skip, the device can read only the necessary data from the card.
| Suprema Smart Cards | Custom Smart Cards | |
| Type of Smart Card | AoC (Access on Card) SCC (Secure Credential Card) | Custom Smart Card issued by 3rd Party without biometric data |
| Supported card format | MIFARE, DESFire, iCLASS, SEOS | MIFARE, DESFire, FeliCa* |
| Data saved in card | RAW (Binary) | RAW (Binary) |
| Issuing card | Issue Card using Suprema Device or BioStar 2 Software | Not supported |
* FeliCa requires BioStar 2 v2.9.6 or later and a device with firmware that supports FeliCa through Custom Smart Card Layout.
[Tutorial Video] How to Configure Custom Smart Card Layout

The custom smart card layout set in the video can be applied to multiple devices connected to BioStar 2 version 2.9.4 with the "Device Batch Edit" feature.

Log in to BioStar 2 v2.9.4 or later → Devices → Select multiple devices with the [Custom Smart Card] layout feature, enable [Custom Smart Card], and select the particular layout you have previously created.
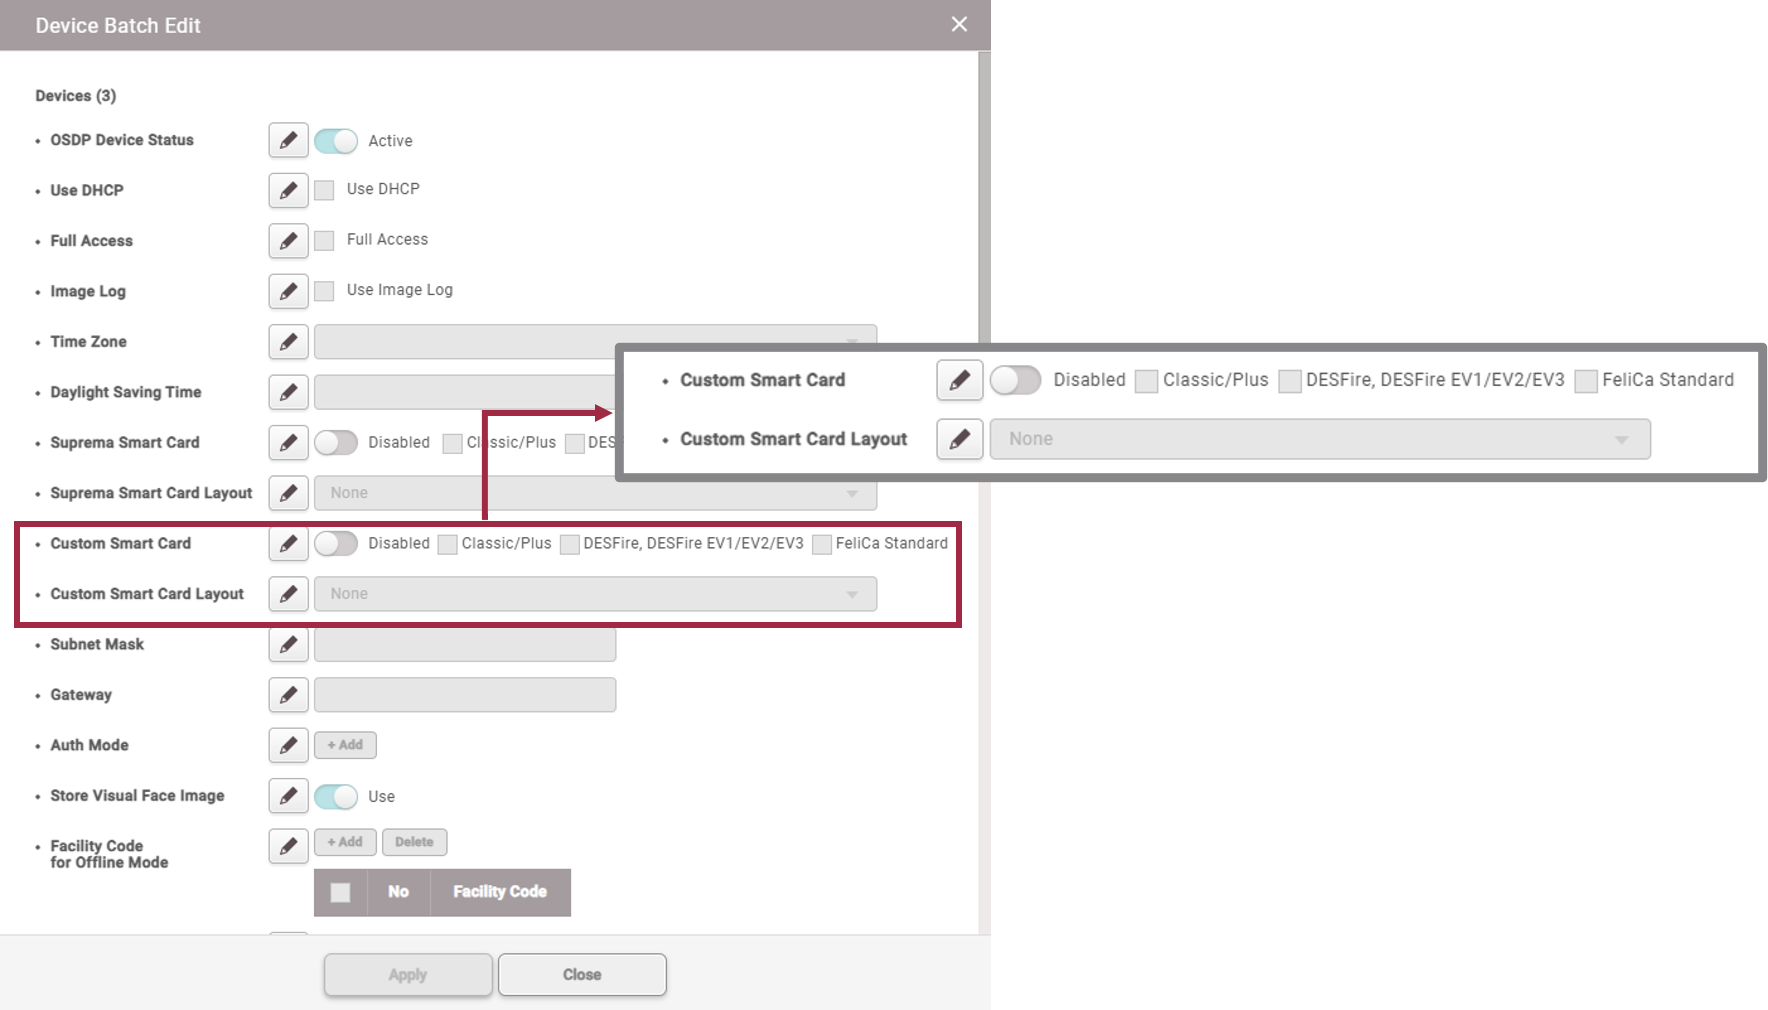
[Custom Smart Card] features setup in BioStar 2 Software ▶ Devices
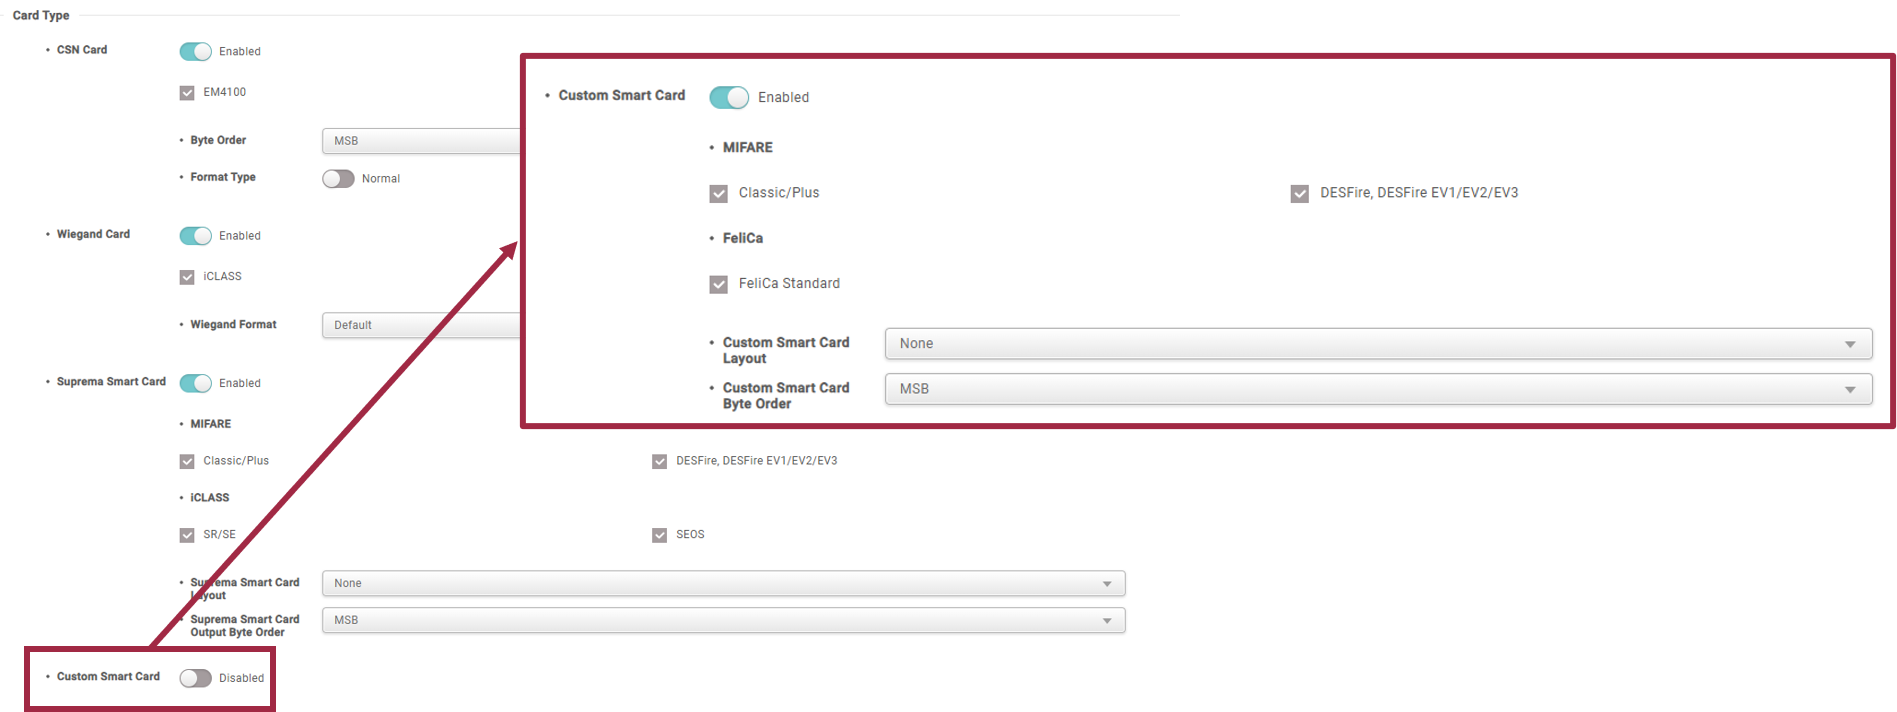
Step 1. Login to BioStar 2
Step 2. Go to Devices
Step 3. Select the device supporting the [Custom Smart Card] feature
Step 4. Go to Authentication → Card Type
Step 5. Enable Custom Smart Card, and then select the card types you want to use
Step 6. Under Custom Smart Card Layout, select the layout you want to use
 Note
The custom smart card feature is set as 'disabled' by default.
Note
The custom smart card feature is set as 'disabled' by default.
How to enroll custom smart cards to users in BioStar 2 Version 2.9.4 and above
Step 1. Login to BioStar 2
Step 2. Go to User
Step 3. Click on one of the users to add a custom card credential or click on "ADD USER" to create a new user with a custom card credential
Step 4. Credential → Card → Card Type → Smart Card
Step 5. Select a device that supports Custom Smart Card feature

Step 6. The registration options for a custom smart card are the same as theose used when enrolling a CSN card in BioStar 2.
Note
Credential → Card → Card Type → Read Card: the read card feature in BioStar 2 can be applied to custom smart cards as well.How to Set [Custom Smart Card] Layout Using the Device ManagerPlease refer to the article below for the supported Suprema devices and firmware versions for the Custom Smart Card Layout feature.
▶ [BioStar 2] Supported Product and Version List of Custom Smart Card